

Estimated reading time: 8 minutes
Mother Nature has designed an astonishing array of colorful beetles. If you are looking for colored pencils art ideas, look no further. When it comes to pattern variation and color combinations, there is no comparison. I dare say beetles outdo butterflies when it comes to creative design.
Selecting a beetle for this tutorial was not easy. I landed on a shiny little jewel bug because colored pencils could really do this one. You will learn a unique technique for drawing with colored pencils. The first step involves watercolor.

Take a look at my collection of stunning, colorful beetles and other bugs on Pinterest:
Color in Nature: Butterflies & Bugs
Why draw with colored pencils on top of dry watercolor?
Colored pencils work beautifully when applied to a layer of dry watercolor. There are two reasons.
Firstly, dry watercolor is a crisp surface. It is smooth and easy to draw on, and you can get amazing effects. For best results, use smooth, not grainy watercolor paper.
The second reason is the color of the underpainting. You can draw rich details on this surface. The colored pencil marks blend beautifully with the colors of the watercolor underneath.
Beetle symbolism
I can’t start this tutorial without mentioning ancient Egyptian scarabs. The Egyptians revered the beetle as a symbol of creation and rebirth.
Egyptian art and sculptures are full of scarab imagery. The scarab god Kheper is probably inspired by the dung beetle, who pushes a ball of earth and dung. Beetle babies emerge from this ball. It looks like they are born out of nothingness, mirroring the myth about the creation of the universe.
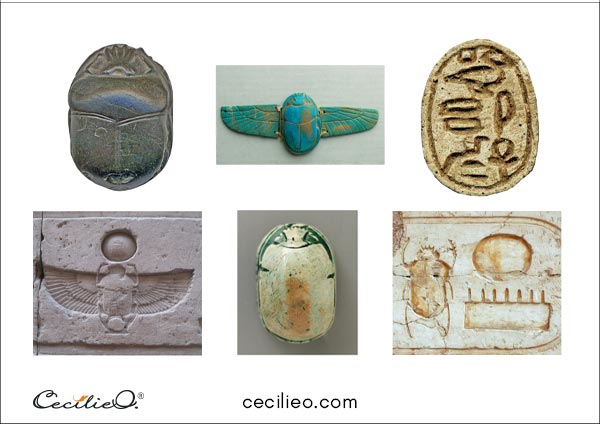
Egyptian mummies had their hearts removed and replaced by a scarab talisman. Its purity would protect the soul in the afterlife. The scarab is a symbol of the sun god Re (Ra) as well.
Now let’s get on with the little bug!
Step 1: Drawing the beetle
What art supplies do you need for this tutorial? A graphite pencil, eraser, watercolors, a set of colored pencils, and white gouache.
Drawing a beetle is not hard. If you want to draw a symmetrical beetle, refer to my butterfly drawing tutorial. Here, I have drawn the beetle freehand.
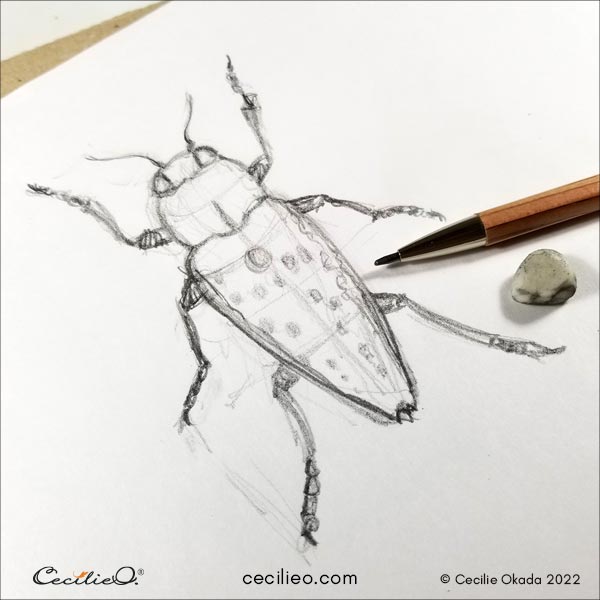
I traced my sketch on a LED light tracing pad. When you trace a drawing onto watercolor paper, you can also position it nicely.

The free One Tree Art Club library has a large collection of outlines for my tutorials that you can download and trace. This beetle drawing is available in One Tree Art Club | Creative on the Buy Me a Coffee platform.
Step 2: Watercolor underpainting
Paint the whole beetle green, except for the eyes and legs.

Moist some tissue paper and twirl it to make a tip. Remove pigments in the areas where the beetle is ochre-colored.

Wait for the green to half dry. Paint with ochre watercolor along the sides, the dots, and other areas where you see this color. In some places, the ochre and green will blend. Let the colors flow.
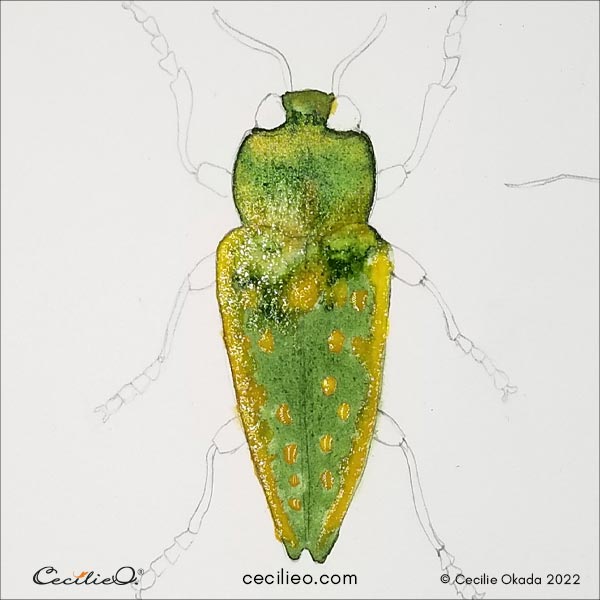
Paint the eyes rust-red and the legs purple.
Notice how the watercolors made interesting streaks in the upper left body. In your painting, the blended watercolors will get another, distinct look.

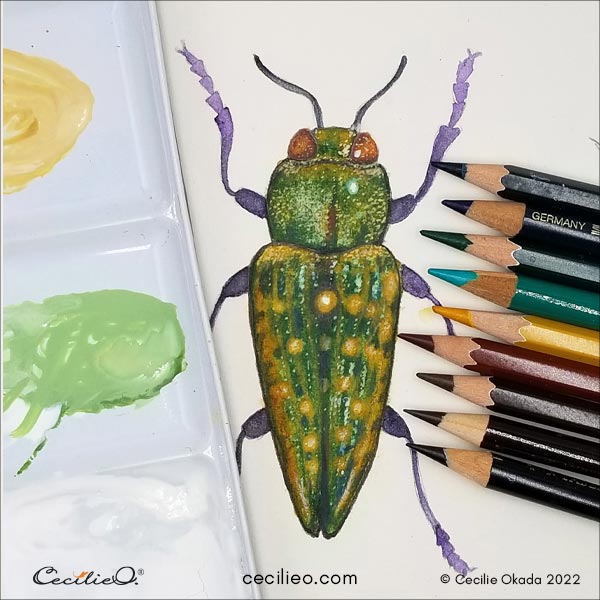
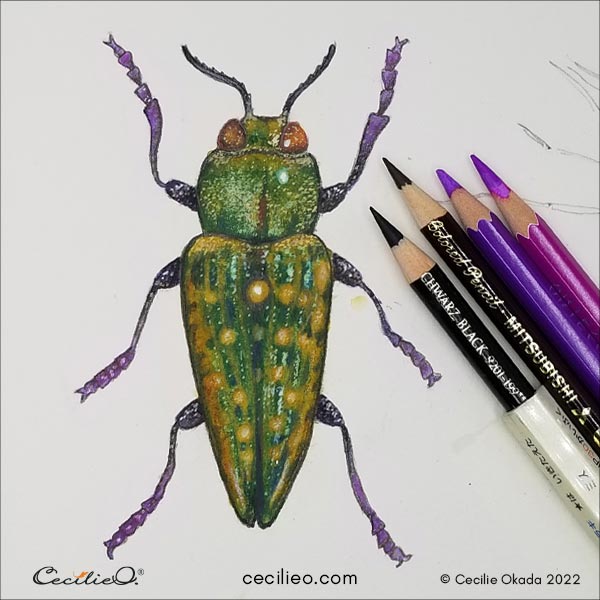
Drawing the details of the beetle with colored pencils
I used a sheet from an old collection of left-over smooth watercolor papers. But it is not quite as smooth as the paper I usually use. So what happened when I drew with a dark green pencil? The pencil marks are not even. They have left an impression similar to the bug’s body. Happy accidents often occur when making art. The dark green pencil drawing on the head create the curving effect.
I drew over the ochre parts with an ochre pencil. Notice the soft edge, just like in the photo. This kind of effect comes from drawing on top of watercolor.

I used my watercolor pencils in this tutorial, not regular colored pencils. It was not for the quality of turning into watercolor, but for the soft greasiness. Regular colored pencils are harder and don’t layer all that well.
Next, I drew the vertical lines with dark green and brown, and the lighter lines with ochre.

When you draw with a normal graphite pencil, you use pressure to make highlights and shadows. Use the same method for drawing with colored pencils. Study the beetle photo to become familiar with the shadows and highlights.
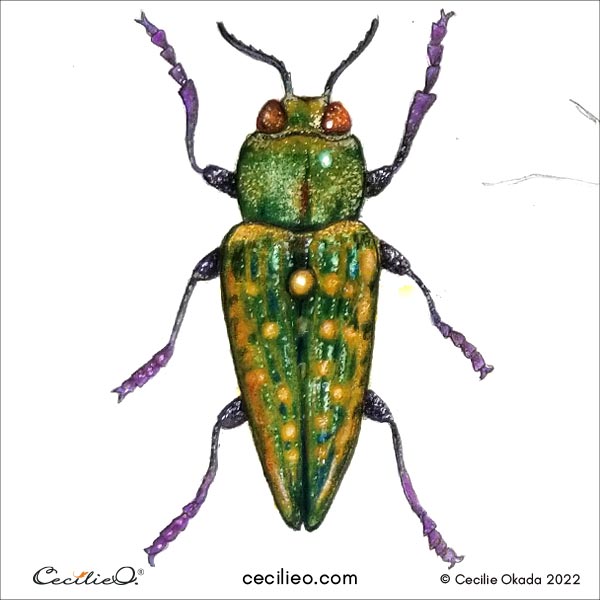
Creating glimmer with gouache highlights
I only use one gouache color, namely white. You don’t need any others when it is a supplement to regular watercolors. Mix in a tiny bit of watercolor to make pastel colors from the white. In the case of this shining bug, you need three gouache colors: White, pastel green, and pastel ochre. They will be used for highlights.
Painting the highlights in the right spots can be a challenge. It is what makes the bug look realistic. Practice highlights on scrap paper first to figure out paint quantity on your brush. It should be just a little. Take your time and study the photo. Never try to copy blindly and use the picture only as a guide. Blind copy makes for stiff, lifeless art. In nature, no two beetles are alike. Your beetle won’t be either.
In this creative phase, there is a back and forth between drawing more details and painting highlight dots. This is the fun part! Look at the photo, then look at your drawing. Do something else, and come back and look again with fresh eyes.
Lastly, finish the details on the legs and feelers.

And that, dear fellow artist, is how you draw a realistic jewel beetle with colored pencils. Don’t forget to look for more art ideas for colored pencils from the world of beetles!
Some more tutorials to explore:
- How to Draw & Watercolor Four Colorful Butterflies
- Flowers to Paint in Watercolor: Velvet-Red Slipper Orchid
- Why Meditation Improves Your Creativity
- How to Watercolor Light and Shadow on a Magnificent Leaf
- Beginner Sketching Ideas from Nature
Find information about art materials needed for this tutorial in my Guide to Art Supplies.


