

Estimated reading time: 7 minutes
You are likely familiar with the image of a serene lotus flower floating on a pond. There are actually many types of lotus flowers, one of which grows atop a tall stem. Its elegant petals sway gracefully in even the slightest breeze. The large, circular leaves add to the ornamental appeal of this beautiful flower. To capture its artistic essence we will use both watercolors and colored pencils. With this mixed-media approach, we can create a realistic representation with intricate details.
Many cultures cherish the lotus flower
The lotus flower has been a source of inspiration in many cultures and mythologies. In ancient Egyptian mythology, it signifies rebirth and creation. In Yoga and all over the East, it is a symbol of spiritual awakening and enlightenment. You can read more about it in my yellow lotus flower watercolor tutorial.
Mindfulness while painting the watercolor lotus flower
The resilience and beauty of the human spirit, hope, and renewal are all embedded in the lotus. Try to express these sentiments in your painting as an exercise in mindfulness. Allow the creative process to become a meditative experience.
Let’s get started.
Step1: Drawing the flower
I was drawn to this particular type of lotus for its elegant beauty. The petals do not form neat, circular rows. They are asymmetrical. To fit the leaves inside a small limited space was quite a challenge, though. I am limited to a small square shape for my tutorials. Otherwise, the tutorials become too big and involved. That is why I arranged the leaves around the stem. When you draw the flower, I encourage you to allow a bigger space to unfold your lotus flower. In that way, you will not have to struggle as I did.

The photo of the flower below is my model. For the leaves, I used an image from a stock photo site. It is not a Creative Commons image, so head over and look at it there. Here are more leaves you can look at for inspiration.

If you want to use my drawing for your painting, you can by becoming a member on my Buy me a Coffee profile. You get outlines for all my latest tutorials there.
I offer a free library, too. You find PDF files with outlines for loads of my free watercolor tutorials there.
If you want to learn how to draw flowers in a simple, easy way, check out my book “How to Draw Flowers Step by Step”. It includes a similar lotus flower, too.
Step 2: Watercolor a plain wash
The aim of this tutorial is a realistic lotus flower painting. To this end, we watercolor a plain layer of pink and green. The details will come later.
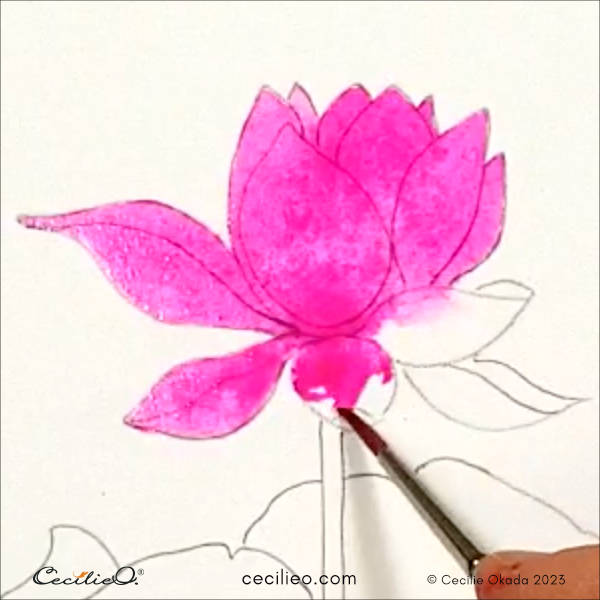

Step 2: Watercolor details on the flower head
When I was making this painting, I had to go and do something else. So the paint dried before I could do a crucial step: Soaking up the pink color in the highlight areas of the petals. Soaking up from half-dry paint is easier than from dry. I used wet tissue paper rolled up with pointed tips. Since the petals are stripy, I “drew” stripes with tissue paper. Perhaps it was an advantage that the paint was dry? In any case, use a fine, pointed brush to paint details. Move the paintbrush in the direction of the stripes. Use both a bright pink and a darker, purplish pink for the dark areas.

Step 3: Use colored pencils for added details
I picked up a few pink and purple colored pencils from my collection. Experiment with what you got. The white color is a greasy polychrome. It is easy to make stunning highlights with this type of white pencil. Much easier than paint!

Step 5: Clean up outlines
It helps to clean up the outlines of the flower. You see more clearly what is missing, and what needs to change. Redraw the outline with a sharp, hard pencil. Mine is 5H. It will give a clean line that will not disturb the delicate look of the petals. Paint around the outlines with white gouache to clean up any stray paint. This painting is a neat, realistic piece, as opposed to a loose painting style (where stray paint is a bonus).

Step 5: Upgrade the leaves with more watercolor
The leaves, however, need flowing paint within the boundaries of the outline. Paint over the first green layer with plain water. Then, let loose with yellow, ochre, and grass-green. Let the colors swirl into patterns.

Use a dark green watercolor pencil to draw the veins on the leaves. Activate with water. If you don’t have watercolor pencils, a regular pencil will do. Just don’t draw too deep lines.

Step 6: Refine the leaf details with colored pencils
The leaves are inspired by the reference photo but are mostly imagination. Look at the photo for cues on light and shadow. Draw with colored pencils to create depth. You can also use my painting for hints on this. The last part of a painting is always the most creative. You apply your artistic sensibility with finishing touches and alter the final look. Always remember that reference photos are nothing more than guides. Not something to copy.

And that, dear fellow artist, is how you watercolor a lotus flower. Happy painting!


For a list of art materials you need for this tutorial, visit Guide to Art Supplies.


